Peeking into Oracle using Linux tracing tools – five tools in five minutes

Five tools in five minutes?

What’s that supposed to mean, you will be asking! Well, one week ago at Trivadis Tech Event, I had the honor of being invited to participate in the Oracle Lightning Talks session organised by my colleague Ludovico Caldara, where every topic has to be presented in five minutes (which of course makes for quite an interesting “listening experience” for the audience …).
To sort of “maximize the mismatch”, I chose to present on Linux tracing tools – not one (normally you’d need hours to explain just one) – but five, one for every minute 😉

So here’s my personal list of appetizers, you’ll find some links at the end to really get you started:

strace

So, strace, you will be thinking, that sounds a bit boring, doesn’t it? Well, perhaps, but it’s a good tool to start an investigation. Oracle has its “wait event lingo”, – but what’s going on underneath?
Here for example, we’re stracing the CKPT process, who says he’s doing a control file parallel write. With strace we can see the asynchronous IO request it issued (io_submit), the two file descriptors it was issued to, and how the process waits for completion in a blocking IO call (io_getevents):

$ strace -tt -f -e write=all -v -s 100 -p $(pgrep ora_ckpt)

So strace can be useful, but beware, it will slow down the process being traced – check out Brendan Gregg’s post “Strace Wow Much Syscall” (nice title isn’t it ;-)) listed in the appendix. Speaking of whom …

https://github.com/brendangregg/perf-tools

… Brendan Gregg has a very nice collection of scripts on github, following the unix/linux philosophy, “one tool one purpose”.
Here, for example, I’m using iolatency to get a meaningful representation of IO latencies to a voting disk on one of my VMs:

$ lsblk/dev/vdb
$ ./iolatency –d 251,16

Or check out execsnoop, which shows newly created processes on the system – just watch how clusterware is constantly monitoring itself and others …

$ ./execsnoop

Useful little scripts, you could write them yourself!
Just have a look at what’s to be discovered in …

The /proc filesystem

Its content doesn’t always come as nicely formatted as the /proc/meminfo us DBAs are used to using ;-), but it may be possible to look in the kernel source to figure out what it means… For example, you might look in fs/proc/stat.c to figure out this:

$ cat /proc/stat

And perhaps even more helpful, we have lots of per-process information under /proc/<pid>/.
For example, process memory mappings, like this one here of the Oracle log writer:

$ cat /proc/$(pgrep ora_lgwr)/maps

Ok. Two left, time for the big shots… Enter –

perf

Perf has many uses, but one of the most frequent probably is sampling on-cpu functions. Say I want to determine how much overhead it is setting statistics_level to all.
I‘m executing a simple two-table join, first with statistics_level set to all, and then, with statistics_level set to typical, and for both, I sample what runs on cpu using perf. The result: not much of a difference!

$ perf record -p  -o all_hj.data sleep 30
$ perf record -p  -o typ_hj.data sleep 30
$ perf diff typ_hj.data all_hj.data

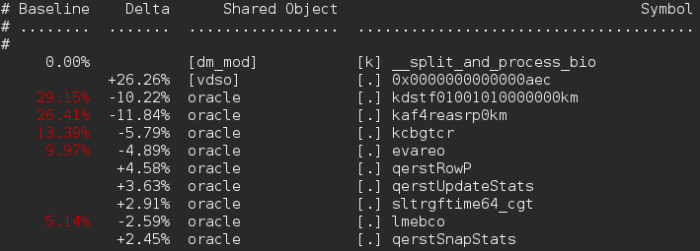
Well. Oracle was doing a hash join. Now I do the same, forcing a nested loop join, what happens?

$ perf record -p  -o all_nl.data sleep 30
$ perf record -p  -o typ_nl.data sleep 30
$ perf diff typ_nl.data all_nl.data

Oracle spends 26% of the time in a vdso call, getting the current time from the operating system!

That‘s just one example of what you can do with perf, there’s numerous others – and possibly an even more amazing tool is …

systemtap

Using systemtap, I can profile user-space (here: Oracle) functions.
This all builds upon the awesome investigations of two guys, Luca Canali and Frits Hoogland, whose work you will find linked in the appendix.
So say I’d like compare two versions of a Java program, one hard parsing all the time (using plain java.sql.Statement) and another that uses bind variables (by means of java.sql.PreparedStatement). What are they doing „under the hood“, and how long do these operations take?

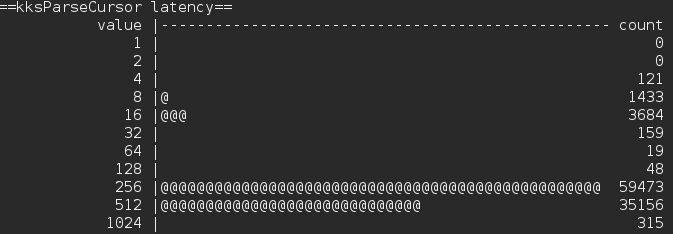
This is one thing I could do: get a latency histogram of the Oracle function kksParseCursor. First, the case of doing a hard parse every time: Most parses take between 128 and 512 ms.

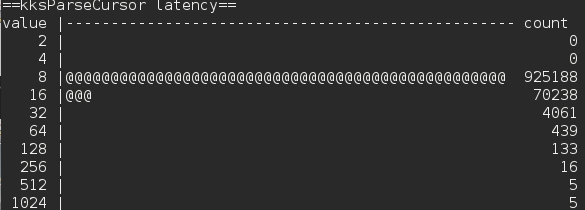
Then we have the code using bind variables – most parses take less than 8 ms here…

Again, this is just a starting point … possibilities are endless. So to get you started, have a look at the appendix, and: enjoy!

Appendix: What to Read

System Tap into Oracle for Fun and Profit
Life of an Oracle I/O: Tracing Logical and Physical I/O with SystemTap
Linux strace doesn’t lie after all.
How long does a logical IO take?
strace Wow Much Syscall
perf Examples

expdp on the command line

Of course, data pump is just great (think of all the functionality it provides, for data masking, sampling, and what not) – but mastering its syntax and semantics can be, well, a bit tedious 😉
Here, I’ll restrict myself to syntax (although semantics might be the more tricky part, think ANDED includes, combining data and metadata filters, etc.), – or to be precise, it’s not about expdp syntax but what arrives there after command processing by the shell.
Actually, perhaps we should not stress ourselves overly to get the command line right, – we’ve been told in advance …

Depending on your operating system, the use of quotation marks when you specify a value for this parameter may also require that you use escape characters. Oracle recommends that you place this parameter in a parameter file, which can reduce the number of escape characters that might otherwise be needed on the command line.

(this is actually all over the place, but see e.g. http://docs.oracle.com/cd/E11882_01/server.112/e22490/dp_export.htm#SUTIL853)

Still, sometimes it’s just nicer to put it in one line instead of creating a parfile (plus, you don’t litter the filesystem…). So, let’s try the command line. But first, as to my “sources” – there must be more, but I’ve found two excellent texts online on shell quoting and escaping:

Although I will be quoting the first one more, I really recommend the second text for its excellent coverage of the concepts, starting out with the order of evaluation (the terminal, the shell, the command) as pertains to quoting.

One other thing before we begin: My OS is OEL 6.5, and I’m using bash version 4.1.2.

Ok, let’s start. My example export contains a metadata filter (include) and a data filter (query), and in a parfile it would look like this:

[oracle@node5 ~]$ cat parfile
include=table:"like 'OBJECT%'"
query=objects1:"where object_id < 99"
dumpfile=test.dmp
reuse_dumpfiles=true
directory=dpdump_fs

A straightforward try

Now, let’s just simply try what happens when we do the same on the command line. Just to be sure all those quotes in the include clause really are needed, this is straight from the docs (http://docs.oracle.com/cd/E11882_01/server.112/e22490/dp_export.htm#SUTIL853):

INCLUDE = object_type[:name_clause] [, …]
The name_clause is optional. … It must be separated from the object type with a colon and enclosed in double quotation marks, because single quotation marks are required to delimit the name strings.

[oracle@node5 ~]$ expdp user/pw include=table:"like 'OBJECT%'" query=objects1:"where object_id < 99" dumpfile=test.dmp reuse_dumpfiles=true directory=dpdump_fs

Export: Release 11.2.0.4.0 - Production on Tue Jul 22 22:42:02 2014

Copyright (c) 1982, 2011, Oracle and/or its affiliates.  All rights reserved.

Connected to: Oracle Database 11g Enterprise Edition Release 11.2.0.4.0 - 64bit Production
With the Partitioning, Real Application Clusters, Automatic Storage Management, OLAP,
Data Mining and Real Application Testing options
ORA-39001: invalid argument value
ORA-39071: Value for INCLUDE is badly formed.
ORA-00936: missing expression

The error message does not tell us too much, although for datapump, it is not too bad ;-))

An easy way to see the arguments expdp was passed is “stracing” the command:

[oracle@node5 ~]$ strace -o strace.out expdp user/pw include=table:"like 'OBJECT%'" query=objects1:"where object_id < 99" dumpfile=test.dmp reuse_dumpfiles=true directory=dpdump_fs

and looking at the first line:

[oracle@node5 ~]$ head -1 strace.out
execve("/oracle/base/product/11.2.0.4/dbhome_1/bin/expdp", ["expdp", "user/pw", "include=table:like 'OBJECT%'", "query=objects1:where object_id <"..., "dumpfile=test.dmp", "reuse_dumpfiles=true", "directory=dpdump_fs"], [/* 37 vars */]) = 0

Or you could write a simple shell script to just spell out the arguments:

got 6 arguments
arg 1 = user/pw
arg 2 = include=table:like 'OBJECT%'
arg 3 = query=objects1:where object_id < 99
arg 4 = dumpfile=test.dmp
arg 5 = reuse_dumpfiles=true
arg 6 = directory=dpdump_fs

So, what is missing here – for now, we’re just focusing on the include part – are the double quotes surrounding the where clause (we have table:like … instead of the required table:”like …”
Why? The double quotes prevented the space between like and ‘OBJECT%’ from being interpreted as a shell metacharacter, which means, as a delimiter of arguments. The space being quoted, like and ‘OBJECT%’ become part of the same argument. The quotes that accomplished this are removed and not passed to the command.
Citing from the aforementioned Unix/Linux Shell Command Line Quoting Mechanisms:

“The most common shell meta-character is the blank or space character that shells use to separate arguments. The shell does not pass any blanks and spaces to the command; the shell uses the blanks and spaces to separate and identify individual command line arguments.
[…]
Quoting is used to prevent the shell from acting on and expanding the meta-characters. The quoting causes the shell to ignore the special meaning of the character, so that the character gets passed unchanged to a command as part of an argument.
[…]
A “quoted” blank does not separate arguments.
[…]
The quoting delimits (identifies) a string of characters; the quoting mechanism is removed and is not part of the string passed to the command. Only the characters being quoted are passed to the command.”

So, even though what we visually perceive is the “grouping” quality of the double quotes, what really is happening is the blank being quoted and “neutralized”. Which means we should get the same result if we remove the double quotes but quote the space. Do we?

[oracle@node5 ~]$ strace -o strace.out expdp user/pw include=table:like\ 'OBJECT%' query=objects1:"where object_id < 99" dumpfile=test.dmp reuse_dumpfiles=true directory=dpdump_fs

[oracle@node5 ~]$ head -1 strace.out
execve("/oracle/base/product/11.2.0.4/dbhome_1/bin/expdp", ["expdp", "user/pw", "include=table:like OBJECT%", "query=objects1:where object_id <"..., "dumpfile=test.dmp", "reuse_dumpfiles=true", "directory=dpdump_fs"], [/* 37 vars */]) = 0

Not really. The space is “neutralized” but now, the single quotes get stripped out, for the same reason as above: the quoting mechanism served its purpose and gets removed.

Keeping the quotes

Ok, so let’s try escaping the double quotes to make sure we keep them.Also, let’s temporarily remove the query part so we clearly see where the problem occurs (should one occur).

[oracle@node5 ~]$ strace -o strace.out expdp user/pw include=table:\"like 'OBJECT%'\" dumpfile=test.dmp reuse_dumpfiles=true directory=dpdump_fs

Export: Release 11.2.0.4.0 - Production on Tue Jul 22 23:08:12 2014

Copyright (c) 1982, 2011, Oracle and/or its affiliates.  All rights reserved.

Connected to: Oracle Database 11g Enterprise Edition Release 11.2.0.4.0 - 64bit Production
With the Partitioning, Real Application Clusters, Automatic Storage Management, OLAP,
Data Mining and Real Application Testing options
ORA-39001: invalid argument value
ORA-39071: Value for INCLUDE is badly formed.
ORA-00911: invalid character

oracle@node5 ~]$ head -1 strace.out

execve("/oracle/base/product/11.2.0.4/dbhome_1/bin/expdp", ["expdp", "user/pw", "include=table:\"like", "OBJECT%\"", "query=objects1:where object_id <"..., "dumpfile=test.dmp", "reuse_dumpfiles=true", "directory=dpdump_fs"], [/* 37 vars */]) = 0

What happened? One, the include argument gets split, because not being quoted, the space acts as an argument delimiter again.
Second, now the single quotes got split out, because now they are delimiters only. This is perhaps easier to see in an argument listing:

got 7 arguments
arg 1 = user/pw
arg 2 = include=table:"like
arg 3 = OBJECT%"
arg 4 = query=objects1:where object_id < 99
arg 5 = dumpfile=test.dmp
arg 6 = reuse_dumpfiles=true
arg 7 = directory=dpdump_fs

Keeping the single quotes

OK – to keep the single quotes we have to quote them, too.

[oracle@node5 ~]$ strace -o strace.out expdp user/pw include=table:\"like \'OBJECT%\'\"  dumpfile=test.dmp reuse_dumpfiles=true directory=dpdump_fs
Copyright (c) 1982, 2011, Oracle and/or its affiliates.  All rights reserved.

Connected to: Oracle Database 11g Enterprise Edition Release 11.2.0.4.0 - 64bit Production
With the Partitioning, Real Application Clusters, Automatic Storage Management, OLAP,
Data Mining and Real Application Testing options
Starting "USER"."SYS_EXPORT_SCHEMA_05":  user/******** include=table:"like 'OBJECT%'" dumpfile=test.dmp reuse_dumpfiles=true directory=dpdump_fs 
Estimate in progress using BLOCKS method...

oracle@node5 ~]$ head -1 strace.out
execve("/oracle/base/product/11.2.0.4/dbhome_1/bin/expdp", ["expdp", "user/pw", "include=table:\"like", "'OBJECT%'\"", "dumpfile=test.dmp", "reuse_dumpfiles=true", "directory=dpdump_fs"], [/* 37 vars */]) = 0

Now, this actually worked! But why? Quote-wise, all seems fine, expdp receives all the quotes it needs, but … the include argument is split! So evidently, expdp reassembles the argument, probably making use of the fact that the first part – include=table:\”like – misses its closing double quote.
Unfortunately, strace and/or ltrace do not help our understanding here, and while fascinating things can be achieved using gdb on oracle – just see Frits Hooglands blog and whitepapers – I don’t have sufficient experience with gdb yet to continue the analysis further here.
All I could say is that when the c processing is finished, the reassembled command is stored in the master table:

QL> select name, value_t from SYS_EXPORT_SCHEMA_05 where name in ('CLIENT_COMMAND', 'NAME_EXPR', 'INCLUDE_PATH_LIST', 'INCLUDE_PATH_EXPR');

NAME 			VALUE_T
---------- ------------------------------ ------------------------ 
CLIENT_COMMAND	 	user/******** include=table:"like 'OBJECT%'" dumpfile=test.dmp reuse_dumpfiles=true directory=dpdump_fs keep_master=yes
NAME_EXPR		like 'OBJECT%'
INCLUDE_PATH_LIST	'TABLE'
INCLUDE_PATH_EXPR	IN ('TABLE')

A “cleaner” 😉 alternative that works, too

Of course, don’t take me seriously on the “cleaner” – but this might just be nicer because there is no “secret reassembling” here – just a solution that must work and does work 😉
We are not escaping the double quotes at all, instead using single quotes twice (i.e., for two blocks each delimited by single quotes) to protect the contained metacharacters (spaces and double quotes). The two single-quoted blocks are adjacent and so, get concatenated into one single argument:

[oracle@node5 ~]$ strace -o strace.out expdp user/pw include=table:'"like '\'OBJECT%\''"'  dumpfile=test.dmp reuse_dumpfiles=true directory=dpdump_fs

Export: Release 11.2.0.4.0 - Production on Wed Jul 23 10:09:56 2014

Copyright (c) 1982, 2011, Oracle and/or its affiliates.  All rights reserved.

Connected to: Oracle Database 11g Enterprise Edition Release 11.2.0.4.0 - 64bit Production
With the Partitioning, Real Application Clusters, Automatic Storage Management, OLAP,
Data Mining and Real Application Testing options
Starting "USER"."SYS_EXPORT_SCHEMA_05":  user/******** include=table:"like 'OBJECT%'" dumpfile=test.dmp reuse_dumpfiles=true directory=dpdump_fs 
Estimate in progress using BLOCKS method...

oracle@node5 ~]$ head -1 strace.out

execve("/oracle/base/product/11.2.0.4/dbhome_1/bin/expdp", ["expdp", "user/pw", "include=table:\"like 'OBJECT%'\"", "dumpfile=test.dmp", "reuse_dumpfiles=true", "directory=dpdump_fs"], [/* 37 vars */]) = 0

Completing the command

Finally, let’s add back the query part. We know we have to escape the double quotes…

[oracle@node5 ~]$ strace -o strace.out user/pw include=table:\"like \'OBJECT%\'\" query=objects1:\"where object_id < 99\" dumpfile=test.dmp reuse_dumpfiles=true directory=dpdump_fs
-bash: 99": No such file or directory

This is easy: the < character is not quoted any more, so it gets evaluated as the redirection operator. There’s two things (at least) we could do: surround the double quotes by single quotes, effectively quoting both double quotes and the redirection operator, or just escaping the <:

[oracle@node5 ~]$ strace -o strace.out expdp user/pw include=table:\"like \'OBJECT%\'\" query=objects1:'"where object_id < 99"' dumpfile=test.dmp reuse_dumpfiles=true directory=dpdump_fs

# alternatively...
[oracle@node5 ~]$ strace -o strace.out expdp user/pw include=table:\"like \'OBJECT%\'\" query=objects1:\"where object_id \< 99\" dumpfile=test.dmp 
reuse_dumpfiles=true directory=dpdump_fs

And that’s it – expdp working fine on the command line, and some insights gained (hopefully ;-)) on how the shell works … Of course, there’s always more questions than answers, and so, always more tools to be explored to see if they can help you (gdb might just be the next one for me).

VM cloning, udev and network interfaces on KVM

In my previous post on setting up Oracle RAC on KVM, I mentioned problems with network interfaces & udev after cloning a Scientific Linux (in the following: SL) machine. This is just a short follow-up describing how to successfully clone an SL 63.1 machine on KVM.

Firstly, cloning a VM on KVM can be done using virt-manager or with virt-clone (or even manually, see http://rwmj.wordpress.com/2010/09/24/tip-my-procedure-for-cloning-a-fedora-vm). Choosing the virt-manager method, however, for a SL 63.1 VM that also acts as an ISCSI client, I got the following error message:

Error setting clone parameters: Could not use path '/dev/disk/by-path/ip-192.168.100.2:3260-iscsi-iqn.2012-09.com.skyrac:t1-lun-15-clone' for cloning: iSCSI volume creation is not supported.

Fortunately, the error can be circumvented by temporarily stopping the iSCSI pool. Virt-manager complains about the respective disks not existing, but will perform the clone correctly.

This just as an aside – regarding our topic of network interfaces, by default, virt-manager will automatically choose new MAC addresses for the interfaces.

Now after cloning, restart the iSCSI pool and boot the VM in runlevel 1. Prior to any changes,

ip link show

will show a list of interfaces eth<n+1>, eth<n+2> etc., where eth<n> is the highest number interface name from the clone source.

Checking for udev rules, it turns out

/etc/udev/rules.d/70-persistent-net.rules

still has the clone source’s MAC addresses (which don’t exist on clone target), but there is a file

/dev/.udev/tmp-rules--70-persistent-net.rules

that creates the aforementioned <n+1> etc. interfaces.

Now it is sufficient to simply edit the /etc/udev/rules.d/70-persistent-net.rules, entering the new MAC addresses, and remove the /dev/.udev/tmp-rules--70-persistent-net.rules temporary file. On reboot, interfaces will have the expected eth0 - eth<n> interface names.

Of course, on Scientific Linux or other Red Hat like systems, it is also neccessary to edit the /etc/sysconfig/network-scripts/ifcfg-eth<n> configuration files for hardware and IP addresses, and /etc/sysconfig/network for the hostname. And that’s it!

RAC on a laptop, using KVM and libvirt

There are already some guides on the net on how to run RAC on a laptop – but AFAIK, they involve either Virtualbox or VMWare for virtualization – or at least there’s none using KVM that I know of. So I’ve thought I’d add my experiences using KVM and the libvirt library. I don’t intend this to be a howto – there are still open questions, quirks and workarounds in my setup. Nonwithstanding, perhaps, by just basically giving an account of what I’ve done, I can spare others a little time and frustration … So, let’s start.

Preparing the host

The host OS, in my case, is Fedora 17, running on an Intel I7 quadcore with hyperthreading and hardware virtualization, and 16G of memory.
In addition to the basic libvirt and KVM libraries (plus the graphical interface, virt-manager), it makes sense to install the libguestfs tools. Libguestfs provides commands like virt-filesystems and virt-df to display information on the guests’ physical and logical volumes, and the extremely useful virt-resize that you can use to enlarge the guest disk on the host, at the same time enlarging the physical volume in the guest.

yum install qemu-kvm libvirt python-virtinst virt-manager
yum install *guestf*

Guests overview

In my setup, there are 3 guests: 2 cluster nodes and a third machine combining the functions of DNS server and iSCSI target, providing the shared storage.
The cluster nodes are running Scientific Linux (SL) 5.8, the storage/DNS server SL 6.3. (I plan to set up a 6.3 cluster next, but for starters it seemed to make sense to be able to use asmlib…).
The easiest way to create a guest is using virt-manager – which is what I did. However, to check on and later modify the configurations, I’ve used virsh-dumpxml and virsh edit, and I’ll refer extracts of the xml dumps in the following.

Defining the networks

In virt-manager, prior to installing the guests, you need to define the networks. By default, every guest will be part of the default network, which uses NAT and DHCP to provide the guest IPs. Through this network, the guests will be able to access the internet and the host, but not each other.
So, 2 additional bridged networks will be created (called isolated in virt-manager). Through bridging, guests on these networks will be able to communicate with each other and the host, but not the outside world.

This is how the cluster’s public network looks in the resulting configuration:

[root@host ~]# virsh net-dumpxml priv0
<network>
<name>priv0</name>
<uuid>ee190ff5-174e-450d-16e1-65372a309dfc</uuid>
<bridge name='virbr1' stp='on' delay='0' />
<mac address='52:54:00:A2:FA:79'/>
<ip address='172.16.0.1' netmask='255.255.255.0'>
</ip>
</network>

The network to be used for the private interconnect looks basically the same (of course, the mac address and ip differ) – from the libvirt point of view, both are private, that is bridged/”non-natted” networks.

Installing the guests

When creating the cluster nodes (yes, unfortunately, this is not a typo – I didn’t manage to successfully clone the first node, I had to install the second in the same way – see the Open questions section below …), in virt-manager you need to add two additional interfaces, one each using the configured bridged networks.
This is how one of them, priv0, will look in the guest configuration file:

[root@host ~]# virsh dumpxml sl58.1 | xpath /domain/devices/interface[3]
Found 1 nodes:
-- NODE --
<interface type="network">
<mac address="52:54:00:44:02:a3" />
<source network="priv0" />
<target dev="vnet4" />
<model type="virtio" />
<alias name="net2" />
<address type="pci" domain="0x0000" bus="0x00" slot="0x05" function="0x0" />
</interface>

The interfaces will be recognized by SL during the installation process. Installation completed, one should disable Network Manager in the guest so it cannot overwrite the network configuration. For reference, this is how my ifcfg-eth* scripts look for the three interfaces on the first cluster node:

# Virtio Network Device
DEVICE=eth0
BOOTPROTO=dhcp
HWADDR=52:54:00:7F:F7:94
ONBOOT=yes
DHCP_HOSTNAME=node1.skyrac.com
TYPE=Ethernet

# Virtio Network Device
DEVICE=eth1
BOOTPROTO=none
HWADDR=52:54:00:83:53:b8
ONBOOT=yes
NETMASK=255.255.255.0
IPADDR=192.168.100.10
GATEWAY=192.168.100.1
TYPE=Ethernet
USERCTL=no
IPV6INIT=no
PEERDNS=yes

# Virtio Network Device
DEVICE=eth2
BOOTPROTO=none
HWADDR=52:54:00:44:02:a3
ONBOOT=yes
NETMASK=255.255.255.0
IPADDR=172.16.0.10
GATEWAY=172.16.0.1
TYPE=Ethernet
USERCTL=no
IPV6INIT=no
PEERDNS=yes

For the iSCSI target & DNS server, just one interface has to be added, the one for the public network. So there will be just eth0 and eth1 on that vm.

Setting up the DNS

For DNS, I’ve installed bind on the combined DNS & storage node, stor1.skyrac.com.
In /var/named/, four zone files need to be added, one each for the cluster domain, localhost, cluster domain reverse lookup, and localhost reverse lookup.
For this, I basically followed the instructions in Steve Shaw’s and Martin Bach’s excellent “Pro Oracle RAC on Linux”. For a quick reference, this is how my /var/named/master.skyrac.com and /var/named/192.168.100.rev look – included in the latter 2 are the nodes’ public IPs, the VIPs, and the SCAN IPs:

$TTL    86400
@               IN SOA  stor1.skyrac.com. root.localhost. (
42              ; serial
3H              ; refresh
15M             ; retry
1W              ; expiry
1D )            ; minimum
@               IN NS   stor1.skyrac.com.
localhost       IN A    127.0.0.1
stor1           IN A    192.168.100.2
node1           IN A    192.168.100.10
node2           IN A    192.168.100.11
node1-vip       IN A    192.168.100.20
node2-vip       IN A    192.168.100.21
cluster1-scan   IN A    192.168.100.30
IN A    192.168.100.31
IN A    192.168.100.32

$TTL    86400
@               IN SOA  stor1.skyrac.com. root.localhost. (
42              ; serial
3H              ; refresh
15M             ; retry
1W              ; expiry
1D )            ; minimum
@               IN NS   stor1.skyrac.com.
2               IN PTR  stor1.skyrac.com.
10              IN PTR  node1.skyrac.com.
11              IN PTR  node2.skyrac.com.
20              IN PTR  node1-vip.skyrac.com.
21              IN PTR  node2-vip.skyrac.com.

It’s important to check both hostname lookup and reverse lookup (using nslookup or dig). Errors in the reverse lookup zone file can lead to OUI complaining with “INS-40904 ORACLE_HOSTNAME does not resolve to a valid host name”, which is in fact a misleading error message as you don’t have to set this environment variable when reverse lookup works.
One thing to pay attention to, for those new to bind as me: Don’t forget the dot after the hostname. It signifies to bind that a FQDN has been defined (see, e.g.,  http://www.zytrax.com/books/dns/apa/dot.html).

In /etc/named.conf, I’ve added zone blocks for these 4 zones, and defined stor1.skyrac.com to be the master DNS server for the 192.168.100 domain. For records not in this domain, the server forwards to the host on the default network.

options
{
directory               "/var/named";
dump-file               "data/cache_dump.db";
statistics-file         "data/named_stats.txt";
memstatistics-file      "data/named_mem_stats.txt";
listen-on port 53       { 127.0.0.1; 192.168.100.2; };
allow-query { localhost; 192.168.100.0/24; };
recursion yes;
forwarders { 192.168.122.1; };
};

zone "skyrac.com" {
type master;
file "master.skyrac.com";
};
zone "localhost" {
type master;
file "master.localhost";
};
zone "100.168.192.in-addr.arpa" {
type master;
file "192.168.100.rev";
};
zone "0.0.127.in-addr.arpa" {
type master;
file "localhost.rev";
};

Finally, to make it work, stor1.skyrac.com is configured as the DNS server to be contacted on the cluster nodes, in /etc/resolv.conf:

nameserver 192.168.100.2
search skyrac.com

Preparing the storage

On stor1.skyrac.com, iscsi-target-utils is installed and the service is started:

[root@stor1 ~]# yum install iscsi-target-utils
[root@stor1 ~]# service tgtd start
[root@stor1 ~]# chkconfig tgtd on

In order to define the LUNs, I need to provide logical devices on the storage server. For convenience, what I did was add a second disk in virt-manager, resulting in a second physical volume in the vm, and from this create a second volume group. From that volume group, I then created one logical volume for every LUN I want to export.

Prior to the LUNs themselves, I create a target:

[root@stor1 ~]# tgtadm --lld iscsi --mode target --op new --tid 1 --targetname iqn.2012-10.com.skyrac:t1

Then, the LUNs are bound to the target:

[root@stor1 ~]# tgtadm --lld iscsi --mode logicalunit --op new --tid 1 --lun 1 --b <path of logical volume>

All LUNs defined, the configuration is written to /etc/tgt/targets.conf:

[root@stor1 ~]# tgt-admin --dump > /etc/tgt/targets.conf

This is how it looks in my case:

[root@stor1 ~]# less /etc/tgt/targets.conf
default-driver iscsi
<target iqn.2012-09.com.skyrac:t1>
backing-store /dev/vg_stor/vol1
backing-store /dev/vg_stor/vol2
backing-store /dev/vg_stor/vol3
backing-store /dev/vg_stor/vol4
backing-store /dev/vg_stor/vol5
backing-store /dev/vg_stor/vol6
backing-store /dev/vg_stor/vol7
backing-store /dev/vg_stor/vol8
</target>

On the clients, having installed iscsi-initiator-utils, I can try if discovering the target works:

iscsiadm -- mode discovery --type sendtargets --portal 192.168.100.2
192.168.100.2:3260,1 iqn.2012-09.com.skyrac:t1

Finally, I’ve added the new storage pool in virt-manager, and then added the LUNs as additional storage to the client vms. Actually, the latter step proved tedious and not quite working in virt-manager, so the easier way was to add one LUN in virt-manager, and then, using virsh edit, define the others based on that example. This is, for example, how the first 2 LUNs look on one client:

virsh dumpxml sl58.1 | xpath /domain/devices/disk
<disk type="block" device="disk">
<driver name="qemu" type="raw" />
<source dev="/dev/disk/by-path/ip-192.168.100.2:3260-iscsi-iqn.2012-09.com.skyrac:t1-lun-1" />
<target dev="vdb" bus="virtio" />
<alias name="virtio-disk1" />
<address type="pci" domain="0x0000" bus="0x00" slot="0x0b" function="0x0" />
</disk>-- NODE --
<disk type="block" device="disk">
<driver name="qemu" type="raw" />
<source dev="/dev/disk/by-path/ip-192.168.100.2:3260-iscsi-iqn.2012-09.com.skyrac:t1-lun-2" />
<target dev="vdc" bus="virtio" />
<alias name="virtio-disk2" />
<address type="pci" domain="0x0000" bus="0x00" slot="0x0c" function="0x0" />
</disk>-- NODE --

Now on the clients, the new devices will appear as /dev/sd* and can be partitioned as usual.

And the rest is – Oracle

On the partitioned devices, I’ve used asmlib to create the asm disks, and proceeded to install GI. Here, I ran into a problem: the OUI “flashing-and-blinking-bug” (see also: http://www.masterschema.com/2009/09/flashing-and-blinking-bug-in-oracle-universal-installer-database-11gr2/). Actually, this is related to screen resolution, which according to the GI installation guide, has to be at least 1024*768. With the default video driver chosen for the vm during install, qxl, it was not possible to select any resolution higher than 800*600, but switching to vga and editing the xorg.conf on the vm did the trick – for this, see the very helpful instructions on http://blog.bodhizazen.net/linux/how-to-improve-resolution-in-kvm/.
The screen resolution problem out of the way, the GI install went as usual, and the database home install as well… but with clusterware running, performance was horrible. With iowaits of 50-60% on the OS disks (not the asm disks!), installing iotop

yum install iotop

revealed the culprit: ologgerd. Reducing the log level

oclumon debug log ologgerd allcomp:1

leaves iowait at around 10%, and performance very acceptable. And that’s it so far – I have a working cluster, and first experience with KVM, DNS, and iSCSI …
Of course, I also have lots of things to do more economically, in a more automated way, another time.

Open questions

The most annoying, and certainly to be investigated further, problem was for sure the inability to successfully clone a vm.
After cloning (done from virt-manager), starting in single mode, editing the network configuration (change IPs and MAC addresses), the bridged interfaces did not come up, saying “RTNetlink answers: No such device“. This looks like a udev problem – but I did not find any MAC addresses hard coded in the udev configuration files. Of course, installing every RAC node from scratch is a no-go, so there’s certainly some problem to be solved…